Cleaning / Laundry / Cooking & Baking / Canning / Gardening / Entertaining / Mending / Sewing / Gracious Civility / Organizing / Handwork / Beekeeping

Monday, December 23, 2013

Organizing/Cleaning: Pre-holiday Room Prep

Every year before Christmas (or right after if I'm not that on-the-ball), I help my kids do a deep room de-junking.  The reasoning behind this torture is this - if they plan on receiving gifts (translate to more stuff) they had better make room for the new by thinning out the old.  For example, I know that my daughter loves clothes and inevitably receives something in that category for Christmas.  So we apply the set-hanger rule when going through her closet.  This means you have a set number of hangers and if you get something new, you get rid of something old.  Same applies to drawer space.  The kids end up filling a bag of things to donate, and at least a large garbage bag full of trash.  (Why is it my kids seem incapable of throwing trash away?  It baffles me.)  So here are the tips we use to ready their rooms for Christmas:
  • Clothing: 
  1. Donate all "too-small" items.
  2. Mend or throw out torn, or things with holes.
  3. Leave a little space in drawers - if you can't close it without packing it down, there's too much.
  4. Employ the set-hanger rule and keep a couple empty hangers.
  • Toys:
  1. If it is in current use and good condition, keep it.
  2. If it is broken beyond repair, toss it.
  3. If it has immense sentimental value but you don't use it anymore, it goes in the childhood box in the storage room (this rule has to be used sparingly so you don't end up a hoarder in your storage room).
  4. If you're ambivalent, donate it.
  5. If you don't have space for it, donate it.
  • Desk/School Items:
  1. Toss all broken pencils, scraps of paper and disemboweled pens.
  2. Keep only assignments that are needed for current grades or grading period.
  3.  One or two masterpieces may be kept.
  4. Art projects get digitally captured, then tossed.  
This also happens before birthdays as well as before school starts etc.  Unfortunately, neat and clean kid rooms have a very short shelf-life at my house.  But in this way we at least keep the pits-of-despair at bay on a fairly regular basis. 

Thursday, November 14, 2013

Cooking: Well Planned Dinner = Better Breakfast

This summer my teenage boy discovered he loves breakfast burritos.  I'm pleased as punch with this culinary revelation since a breakfast burrito is a great way to get grain, protein and veggies in one convenient hand-held meal.  So when I mentioned that they keep well in the freezer, my son requested that I make some to have on hand for a quick breakfast before school.  Nice idea, but since he's the main consumer - I flipped the request back around to him and suggested he make it for dinner one night.  So on his night to cook, he made a really big batch of breakfast burrito components.
Since we only made a small dent with what we ate at dinner, we cleared the table and set the leftovers up on the kitchen counter - ready for some assembly-line action.  Here's how it went:
  1. Grab a tortilla
  2. Add some scrambled eggs
  3. Add some hashbrowns
  4. Add some sausage crumbles
  5. Add some cheese
  6. Salsa is an optional ingredient as well
  7. Roll up burrito style (tucking in edges as you roll up)
  8. Wrap in aluminum foil

As you can see - he ended up with a grundle of breakfast burritos.  We placed them in freezer-ziptop bags and he pulls one out once or twice a week for breakfast or even for an after-school or late-night snack.  Preparing one dinner ended up feeding him for a long time.  Hopefully he'll remember that when he's off on his own. 

  • Canning: I Heard It Through the Grapevine

    I was helping a neighbor pick grapes, and since they grow on a fence between yards, the neighbor in back wasn't going to use any of the grapes on their side.  So I enlisted the aid of my daughter and we picked and picked and picked. 

    Those vines were loaded - mother nature's abundance never ceases to amaze me!  I ended up juicing six or seven batches and burned through an entire tank of propane (I always can outside using the burner on the side of my grill).  I made lots of quarts of grape juice, then the rest as grape jelly - using the reduced sugar pectin (so you get more fruit flavor instead of colorful sweet).
    I ended up layering the last little bit of the white and concord grape jelly that didn't fit into jars.  Homemade tastes so much better!
    Although it takes a long time to juice - it is easy as pie and requires very little work and attention.  I tossed all the grape mash onto the garden to be tilled in later. 
    Now for my real canning epiphany.  I don't have a water softener, and my water-bath canner always has that hard-water residue. 
    The residue doesn't show up that well here - but trust me - it's an unsightly pain!
    This doesn't pose any real problem with quality, but my jars always come out with a chalky coating and you have to wipe down every jar and polish it off.  So, I decided to add a couple "glugs" of vinegar to the water this time - and viola! - no residue. 
    Just a couple "glugs" (maybe 1/4 - 1/2 cup) to the water solved any hard-water residue problems.
    I'm sure everyone else knew this trick already - but it was welcome news to me.  Now my jars come out sparkling clean on the outside so you can see the gorgeous fruit on the inside!
    I know I've said it two or three times this fall, but I really think that I'm done canning for sure this year.  Now I've just got to find a place to store it all. . . off to organize!

    Gardening: Cultivating an appreciation for the unusual

    The beauty of gardening is that Mother Nature is full of curve-balls.  That may be part of what frustrates those with green thumbs, but it is also what keeps us coming back.  Pointing out some of natures spectacular displays may just help awaken the green thumb in our kids as well.  If not, your kids will at least think you are a garden-geek and that is pretty amusing as well.  Here are some of the latest garden oddities that I chose to bring to my kids attention:
    Ok, you may not think that a dying house-plant leaf isn't a spectacular display, but really - who can deny it is has a gorgeous way of dying?  Nature may just be trying to teach us that aging can be beautiful in itself.

    My parent discovered a planter covered in alien-looking vines.  Turns out it was a dodder, or a parasitic plant.

    Although it may be a real blight in some areas of the country, it's pretty rare around here and I found it fascinating.  No connection to the soil, but it was thriving like no other.

    Here's what it looks like after we untangled it all from the poor planter-victims. 

    Ok - this is one of my favorite gardens ever!  On Crockett Avenue in Logan, Utah, a man named Bruce Bugbee creates a stunning garden display. 

    This year's theme was the Wizard of Oz - complete with a yellow brick road.

    I love the tin man!

    The whimsical sign that describes the garden quotes the book/movie: "I don't think we're in Kansas anymore Toto."  Love it!

    Eating Autumnal Blooms

    Ok, so I am not a huge plain cake with shortening-based frosting fan.  They are fun to make whimsical and pretty, but not always so tasty.  However, there are a few homemade recipes for frosted layer cakes that really get my taste-buds excited.  This time of year chrysanthemums are blooming their hardy, little hearts out.  Did you know that they are edible?  So here's my version of a sunflower cake using chrysanthemum (pesticide-free) petals and mint leaves.  Chocolate chips make up the seeds in the flower's center.  It is a fun and tasty way to say goodbye to summer and hello to fall.  I really love the liniment cake recipe from the Anne of Green Gables cookbook and I found this link to it online: http://www.food.com/recipe/annes-liniment-cake-anne-of-green-gables-362236 and my favorite frosting comes from the same cookbook: http://www.food.com/recipe/annes-chocolate-fudge-frosting-61886
    While you're at it, you might as well make some raspberry cordial and call it a tea party! 

    Thursday, October 3, 2013

    Cleaning: The Dreaded Defrosting of a Chest Freezer

    Since October is the month for all things scary, I decided to attack the chest freezer in our garage.  Ideally I like to get it defrosted every year, but I'll admit it's been having a 2-year ice age in there.  Not only is it an enlightening experience to see what exactly we've got in there, but it can also be a great way to work out some aggression as you chip away the ice.  Here's the anatomy of my scary, cleaning adventure:
    Choose a nice cool day  so that you can empty all of your frozen food and work without it defrosting too much.

    Yes, here is the chest freezer with the ice-sheets-of-shame.

    I like using a plastic putty-knife to chip the ice off.  You can use hot water to help remove all the ice, but I don't like that system.  I'd rather chip it off and then only have to scoop up the ice-bits in the bottom of the freezer with a dust-pan instead of dealing with a soupy nasty mess that you have to completely dry out so it doesn't form a veritable ice-rink in the bottom of your freezer.  This is where the aggression gets worked out as well as some upper body musculature as you lean over and scrape.

    When it is all clean and clear inside (and all inevitable popsicle stickiness is cleaned up), then comes the fun part.  Organizing!  I have some plastic bins in the bottom of the freezer that I use to organize food by groups as well as utilizing the baskets above.  For example:                          
    • One basket is completely full of freezer jam.  
    • Another contains baking items such as brown sugar, chocolate chips, yeast, butter, coconut, nuts etc.  
    • Another basket holds frozen vegetables, 
    • The 4th basket holds frozen juice, fruits and cheese (yes I know that doesn't go together, but it was the only basket with space leftover). 
    •  I always keep my meats in the very bottom of the freezer for food safety reasons - I don't want any juices dripping on things before the meat freezes completely. 


    Here's the anatomy of my scary, cleaning adventure:

    Friday, September 20, 2013

    Domestic Arts Teach Confidence

    The whole purpose to my teaching my kids domestic skills is to teach them that they can do new and possibly hard things.  I am hoping that by teaching them to cook, clean, sew, entertain, garden, etc. they will learn that they can be stretched outside their comfort zone and not only survive, but thrive.  I came across a quote in the Ensign magazine this past month that really encapsulated what I want my kids to learn in my home:
    Here is a link to the full article which was actually on hope: http://www.lds.org/ensign/2013/09/the-healing-balm-of-hope?lang=eng&query=healing+balm+of+hope

    I hope that whether it be a new attempt at canning, building that bookshelf, trying that new recipe, or planning a dinner party, you will attack it with true confidence.  Definitely a reminder I need myself from time to time.

    Saturday, August 17, 2013

    Baking: Pizza Fixings & Hot Cocoa Mix = Tasty Creations

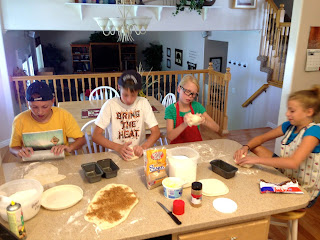
    This summer's baking day had my kids making dough.  They practiced making my grandmother's refrigerator roll dough recipe which is very versatile and fool-proof.  Find the recipe here: http://teach12homeskills.blogspot.com/2012/04/baking-refrigerator-roll-dough.html  We fit baking day into the same day as canning day and so the kids had friends over.  I divided up the dough so that each kid could make 2 mini loaves of their own creations.  My son came up with some creative additions and my daughter decided to go for the savory as well as the sweet.  Here's how it turned out:
    Here's the group attacking their dough.

    My son decided to fill one loaf with Stephen's Candy Cane Cocoa.

    I was a bit skeptical, but it turned out rather tasty.  It would make great holiday rolls.

    The pizza roll contigent with their pizza sauce, pepperoni, Italian seasoning, cheese and garlic.

    My boy wanted to put food coloring on his, and I thought it would be a great way to distinguish everyone's loaves.

    Hot out of the oven!  Color-coded loaves ready to eat.

    My girl with her cinnamon bread and pizza bread.
    My boy with his peppermint-cocoa loaf!
     A fun time was had by all, and we've now found a new use for any leftover Stephen's cocoa!


    Canning: More Fun With Friends

    This year, our canning project was simple to say the least.  I had purchased a large bucket of pitted, pie cherries from an orchard.  So right of the bat, a lot of the work was done for us.  This gave me the chance to focus more on the basics of canning.  As you might imagine, not all of my children were enthusiastic about canning day.  So when I suggested they each invite a friend to help, it really improved the overall mood.  Here's a few of the lessons we learned:
    1. Importance of cleaning and sanitizing the jars - food safety starts with the container.
    2. How to fill the jars and how full to fill them.
     3. Prepping the lids and rings.  Again, clean and sanitized is the key.
     4. All 4 canners working together.
     5. All 7 of our quarts sealed. 
    6. We can look forward to 7 of these!

    Thursday, August 15, 2013

    Cooking: Iron Chef - Cousins Edition

    My kids wanted to have an Iron Chef competition with their cousins this summer.  Any time they have an idea that is: 1. doable 2. creative and 3. teaches a skill, I try to let them go for it.  So one morning my sister and I got the kids together and each of us brought a secret ingredient.  My sister provided couscous and I provided root beer.  After unveiling the secret ingredients each team (boys vs girls) had one hour to prepare an appetizer, entree and dessert.  Each course had to include both secret ingredients.  The girls cooked in my sister's kitchen and the boys in mine.  We synchronized our timers and they were off.  Although both homes did smell a bit smoky for the rest of the day, the damage was not much more than a bunch of dishes to clean up.  And at the end of the hour - we reconvened at my parents home where a younger cousin judged.  After all prizes were awarded, all 9 of us sat down for a creative yet tasty lunch.
    These two were serious competitors dressed for the occasion.

    My son finished with time to spare.

    The winning presentation: Couscous & tomato bruschetta with root beer vinaigrette, couscous & beef stroganoff salad, vanilla sundaes with root beer syrup and couscous-graham crumble topping.

    The girls were a close second with: Couscous salad & crostini, root beer teriyaki chicken over mashed sweet potatoes and root beer ice cream with strawberry couscous and chocolate syrup.

    The judge with his tasting duties.

    Iron Chefs!

    Monday, August 12, 2013

    Cleaning: The art of hospital corners

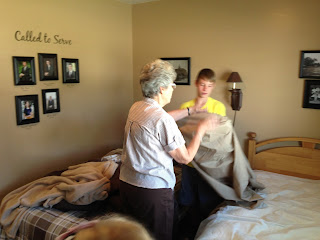
    I was raised by a wonderful housekeeper as I know I've mentioned before.  Luckily, we get to live across the street from her and so I thought I'd take advantage of that and let my bed-making-maven-of-a-mother teach my kids the art of folding sheets and making a proper bed.  No, this is not my kids' first exposure to this domestic activity, but due to the unconventional nature of my kids beds, hospital corners hasn't always been feasible.  Plus, I knew that they'd take instruction from their grandma better than from their mom.  Oh, and a promised trip to Maid-Rite (get the bed-making humor?) for lunch afterward probably helped as well.
    Teaching the trick to folding fitted sheets.

    My son gets his lesson in a nicely folded fitted sheet.

    She's awfully proud of that tidily-folded fitted sheet.

    Now for the bed making process.  They were even taught how to determine the right side of the flat sheet and to remember that a person should only come in contact with the right sides of the sheets like a sandwich. 

    Hospital corners part I

    Hospital corners part II

    Hospital corners part III

    Finished product - nice and tidy!