Cleaning / Laundry / Cooking & Baking / Canning / Gardening / Entertaining / Mending / Sewing / Gracious Civility / Organizing / Handwork / Beekeeping

Friday, April 20, 2012

Dried Fruit: healthier and tastier homemade

 I am a decided fruit lover, so that means when it is hiking and camping season, I'm all about dried fruit or fruit leather (rollups). 

But anyone that has eaten store-bought dried pineapple knows that it is the equivalent to chewing a round, yellow-colored sugar cube. As a dietitian, I think that fruit snacks are pretty much in the same category.  My solution is simple: stock up on cans of sliced pineapple during case-lot sales then dry it in a food dehydrator.  
If you don't have a dehydrator, simply place a rack on top of a baking sheet, lay your pineapple slices on top, and dry in your oven set to the lowest temperature setting for a few hours or until pliable, but no longer moist.

As for homemade fruit rollups (or fruit leather at my house), it is just as simple: toss almost any combination of fresh or canned fruit in the blender and dry. 
 My favorite combinations are canned peaches and a little OJ concentrate, or applesauce with a little cranberry juice concentrate. Blended up canned pineapple with fresh strawberries is also good. Again, if you don't have a dehydrator, no worries – just lightly grease a baking sheet, pour enough of your pureed fruit mixture on the pan to spread out in a rather thin layer. Place this either in your warm oven for a few hours, or a warm place for a few days. My Mom would always put the baking sheet on top of the fridge. Once dried, peel off the baking sheet, roll up and cut into serving pieces. 
I even keep a couple of these in my purse for those extra long shopping trips to keep the hunger at bay just long enough to keep us out of the tempting drive-thrus!


Saturday, April 14, 2012

Baking to Freeze: Crispies

To this day, my Mom enlists my Dad on her stock-the-freezer baking days. They will bake coffee cakes, crispies (elephant's ears pastries), caramel rolls, or doughnuts that then fill their freezer and feed their kids and grandkids for many delicious breakfasts.
I'm not as diligent in stocking my freezer so abundantly with breakfast offerings (mostly because I'm too busy eating eating from my parent's freezer! *wink*), but I will occasionally make some batches of caramel rolls or crispies that make it to the freezer. Crispies – a recipe from my Mom - are excellent trip food. They keep forever – don't take up much space and make tasty snack or breakfast food. Ok, so the dietitian in me requires that I do add that they aren't the most healthful breakfast ever (they're more like cookies), but pair it with some fresh fruit and yogurt or a veggie-filled omelet and you're good to go! Just keep in mind that they are pastries, and balance it out.

Crispies
Jean Sisson's Crispies:
3 cups flour
1/2 tsp. salt
1 tsp. ground cardamon
2 Tbsp. sugar
1 cup margarine
In a large bowl mix together dry ingredients, then using pastry cutter, cut margarine into mixture until it forms pea-sized lumps.
In a separate bowl dissolve:
1 pkg. (~2 1/2 tsp.) dry yeast in 1/4 cup warm water
Blend:
1/2 cup milk
1 egg
3 Tbsp. oil
Add yeast to liquid ingredients, then stir into dry ingredients. Mix until moistened.
 Dough will be sticky.  Cover and chill 1 hour. 

Place dough on floured surface and knead 4 or 5 times only. Roll into 11x18 inch rectangle. Sprinkle with filling:
1/4 cup brown sugar
2 Tbsp. cinnamon
Leave 1/4 inch border of rectangle without filling. 
 Roll tightly, pinch to close, wrap in plastic and chill 1 hour until firm.  

Unwrap, slice into 1/2 inch thick slices. 

On a sugared board or surface, coat cut sides with sugar then roll out to a 5 inch circle (or until thin). 

Bake on a parchment lined cookie sheet or use a silicon baking sheet. Bake at 400º F for 10-12 minutes or until lightly browned. Only five or six fit on a cookie sheet at a time. 

Let cool, store in freezer bags and freeze (after you've sampled some fresh ones). Makes ~ 30.

Friday, April 13, 2012

Gardening: Plant Parenthood

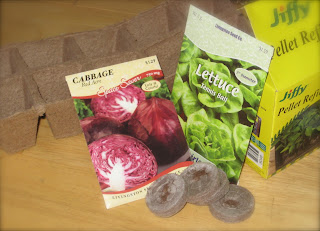
In springtime, who doesn't get a bit excited as hopeful green shoots magically push through the soil? I try to capitalize on that universal excitement with my kids. Around February, we always start 3 or 4 flats of seeds in the basement under inexpensive grow lights. 

(Yes, my dream is to have my own greenhouse – till then, a growlight in the basement and a few windowsills will have to suffice.)

Kids love ownership. Kids need to learn responsibility. What kills these two birds with one stone? Gardening! Here's how for less that a few dollars you can ignite that spark of interest in all things green:
 Peat-pellets are fun just to watch the flat discs hydrate and grow in a matter of minutes when placed in water, but peat pots filled with potting soil work just as well. 
 
 Let your child choose at least one packet of seeds to care for as their own. Did I really want a cactus garden? No, but my boy was enchanted with the idea of growing cacti. *shrugs* So I buy a cheap terra cotta pot and we have a portable cactus garden – if it helps him get excited about gardening, it's worth it.

Walk them through the planting instructions on the back of the seed packet.Then when planted, cover with plastic wrap and place in a warm spot – sunny windowsills work great. Once the seeds have sprouted and are touching the plastic wrap, remove and let them grow. Inevitably, your child will forget to water their seedlings and you'll find them withered or downright crunchy-dead. That's ok – this is an inexpensive way for them to see the natural consequences of their responsibility, or lack thereof.

When your average frost-date is past and it's time to move the seedlings outside, 'harden them off' first by placing them outside in a shady spot for a few hours the first day, then a few more hours the second day with a bit more direct sunlight, then by the third day you can keep them out overnight and they'll be tough enough to survive in 'the wild' whether that is in a pot on your patio or in a garden in your backyard. 

 Keep reinforcing that ownership of their plant means watching, watering and weeding. Asking frequently about their plants so they will want to tend it them all summer long. And don't underestimate the effect of example. I love gardening because my parents love gardening. And let's face it, anything that teaches kids to work and teaches responsibility has to be worthwhile in the parenting-scheme of things!

Tuesday, April 10, 2012

Ironing: Under Pressure

I have to confess that ironing isn't my all-time favorite activity, and even less so when I have to teach my kiddos the art of manipulating a scorching, hot mechanism-of-doom. *slight sigh*
This one I don't start teaching too young for obvious safety reasons. At 6 or 7 we start with pillowcases or cloth napkins. But by the time my kids turn 12, they should be able to iron the trickier items in their closets. For example, this spring break, on our “ironing day” my 12 year old boy practiced ironing his Sunday dress shirt.

 My 9 year old daughter practiced ironing a dress (and judging by the stress level of that attempt, I dare say we jumped the gun a bit – ironing pleats and a gathered skirt are a bit beyond her coordination capability). 

 Next year we'll stick with a more basic shirt or just a skirt for her to practice on. Afterward, they both wanted to iron a few cloth napkins, because after dress-shirts or Easter dresses, it is almost as therapeutic as mindless coloring in a coloring book. 

Of course, every “ironing day” we review the safety issues with an iron:
  •  Never leave a hot iron unattended
  • Always turn off and unplug
  • Taking care with steam
  • Never let the iron 'sit' in one spot
  • Heat level selection
  • Basic, bodily burn avoidance

We really emphasized the use of pressure in 'pressing' or ironing this time. Also, for some reason, ironing leads us into a natural discussion on repentance as we discuss the kinds of wrinkles (sins) we have to work out and how some just need a quick pressing with a dry iron, others may need steam, and some need major spraying and lots of elbow-grease to work them out. Draw whatever analogy you like, but hey – you've got to talk about something while you supervise your kids ironing. *wink & a smile*

Wednesday, April 4, 2012

Baking: Refrigerator Roll Dough

My grandmother has a great roll dough recipe that is so versatile. It's delicious for dinner rolls, cinnamon rolls, or even a loaf of bread. It also keeps in the fridge for a few days so you can make parker house rolls one day, then fresh cinnamon rolls for breakfast the next morning and a mini loaf of bread the day after that – all with the same batch of dough.

Grandma Margaret's Refrigerator Roll Dough:
2 1/2 cups warm water
1/2 cup sugar
3 pkg. (or 2 1/2 Tbsp.) dry yeast
3 cups flour
Mix well, then add:
1 Tbsp. salt
1 egg
1/2 cup oil
4 1/2 cups flour (if making a loaf, I will substitute bread flour here)
Beat with dough hook or knead by hand. Let rise until doubled or store in refigerator in a covered container (may need to punch down occasionally).
Shape into rolls and bake at 400º F for 15-20 minutes for rolls, 30-35 minutes for a loaf. Can store dough in refrigerator up to 4 days.

After dough has risen until doubled, punch down and knead slightly until smooth.  Let the dough relax for about 5 minutes, then you can roll it out to make cinnamon rolls.
After shaping your dough by rolling it tightly into a log, place seam-side down in greased bread pan and let rise 30-45 min.
My favorite way to slice into cinnamon rolls is using fishing line.  After you've rolled out the dough, spread thinly with butter, sprinkled with brown sugar and cinnamon, roll up and pinch to seal seam.  Then slide the fishing line (or sturdy thread) underneath dough.  Cross the ends of the line across the top and pull.  This slices the dough without tearing or making a mess.  Save you from scratching your counter top as well. 
To make caramel rolls, make cinnamon rolls as noted above.  Mean while, in a medium-sized microwave bowl, combine: 1/2 cup corn syrup, 1/2 cup brown sugar and 1 1/2 Tbsp. butter.  Microwave for 1-2 minutes on high.  Stir to combine.  Pour into greased 8x8 pan.  Place cinnamon rolls on top.  Let raise 30-45 minutes.   (Doubling the caramel recipe will fill a 9x13 or slightly larger pan)
One batch of the refrigerator roll dough made all this.  Bake everything at 350.  Cinnamon and caramel rolls bake for about 20-25 minutes until golden, the loaves take a bit longer.
If only you could smell what this picture captured visually.  :)  Don't let your baked goods sit in their pans too long following baking, otherwise their crusts will turn soggy.  Cool loaves on a rack, and immediately invert the caramel roll pan onto a large tray or cutting board.  Wait a moment or two until they release from the bottom of the pan then lift away the pan. 
These freeze well.  You can freeze them in the pan, then after defrosting, just place the pan in a hot oven for a minute or two to warm the caramel, then invert and eat!  Nuts are obviously optional with this recipe - just place pecans on top of caramel before placing rolls. 
This dough recipe makes a great loaf of bread for dinner.
My kids' favorite baking day is when they get to make their own swirled mini loaves of bread. We start with a roll dough recipe, then they roll it out, layer it with cinnamon, sugar, chocolate chips or raisins, roll it up, seal and bake in mini loaf pans.
Emma chose marshmallows and chocolate chips as filling for her bread.
After kneading, and rolling out the dough, she spread it with butter, brown sugar, cinnamon and her toppings of choice.
Roll up and pinch to seal, then place in a greased mini loaf pan.
After raising until doubled (about 30-45 minutes). bake at 350 for 25-30 minutes.


Monday, April 2, 2012

Homemaking Day: Laundry

I think we need another laundry homemaking day at my house. As I've been blogging, I realize all the gaps in my kid's domestic education. So, here's what we covered one morning during spring break. 
  • How to read the care label on clothing (How do decipher those enigmatic symbols that I hate!)
  • Great link for laundry symbols: http://www.textileaffairs.com/lguide.htm
  • Emptying lint traps: how, when and why
  • Fabric softener: how and when to use
  • Treating stains: bar of soap trick, using cold water & a soft toothbrush, lemon juice, vinegar etc.
  • Reinforce turning clothes right side out unless otherwise indicated on label
  • How to read the care label on clothing (How do decipher those enigmatic symbols that I hate!)
  • How to line dry or lay flat to dry a sweater
  • How to launder swimwear (never toss in the dryer)
This actually turned out to be more of a game than anything. They had fun finding clothes with symbols that they would then try to decipher. We also had a contest of finding the lint trap, quizzing on stain removal, etc. I had saved out a few clothing items with stains so they could practice treating stains a couple different ways. It took about 30 minutes, but they had fun and I think we actually learned something. (Implementing is another story . . .)