Cleaning / Laundry / Cooking & Baking / Canning / Gardening / Entertaining / Mending / Sewing / Gracious Civility / Organizing / Handwork / Beekeeping

Sunday, November 30, 2014

Partially-Paralyzed Pirate Lessons

 
So it has been an interesting few days as I'm learning how to live with half a face. Above all, I have to say that I am so blessed to be experiencing these lessons on a micro-scale as opposed to those that are so strong as they deal with paralysis on a grand scale. My admiration goes out to those people and those who are blessed to care for them. You are inspiration embodied. 

Gratitude lesson 1: Opposition
Contrary to the obvious opposition lesson of having sickness to appreciate health, the opposition I've learned to appreciate is that of physical restraint. 

The left side of my face is very tired lately as all my facial muscles have been allowed to contract without any restraint. Having an opposing set of muscles is not just aesthetically pleasing, but essential for any amount of comfort or normal muscle function. Laughing and smiling hurts since the left side of my face just contracts like nobody's business without the right side to pull back in opposition 

So I'm very grateful for the restraint of opposition that normally keeps healthy, good muscles in check and keeps them from over exertion. And yes- there is a deeper level of meaning in that analogy that God no doubt is trying to teach me. 

Stay tuned for more lessons from this partially-paralyzed pirate. 


Monday, August 11, 2014

Much Overdue Bee Update: June to mid-August

What with pioneer trek, family reunion, and a knee surgery, I've been a bit remiss in blogging our beekeeping adventures as of late.  And even though we've not added any more bee videos to our youtube channel, at least I can give you a few snapshots that show some of the things we're learning during our first bee season.
First week of June:

  • We took our feeder boxes off and we also got a nice view of the "honey dome" which is a sign of hive prosperity.  


Second week of June: 
  • Can you spot the queen, newly hatched eggs and royal jelly?  Plus there's some newly hatched brood - they are the really hairy ones.  

Third week of June:
  • We noticed our bluebell hive was practicing making queen cups.  To our relief we learned that this is normal behavior and doesn't always mean a swarm is imminent.  They were just practicing.  Sorry, no still pictures of this, a little later on we'll get you some video.
Fourth week of June: 
  • I wasn't there for this hive inspection (family events).  Ash reported nothing spectacular, just more of the same.  The hives were building up the comb and filling up the top brood box.
First week of July:
  • When helping my father-in-law inspect his hives, some burr comb broke apart between frames and exposed this immature, bee pupa.  Yeah, she's not going to make it once her cell was opened prematurely.  Still, sort of interesting, in a really morbid and somewhat sad way.  
  • Also, in the lower photo, can you spot the drone cell?  They really stick out in comparison to other brood cells.


Second week of July:
  • No hive inspection due to pioneer trek.  
Third week of July:
  • We decided to put a honey super on to see if we could get them to draw out comb and fill it in time to harvest this year.  Both brood boxes were drawn out and almost filled so we put a honey super on.  We also had a harvested (super) frame we borrowed from a friend that we put in the honey super which really got the bees going on drawing out the comb in that super.  Did not put the queen excluder on right away since we didn't want to discourage the bees from working up there.

Fourth week of July:
  • Decided to put the queen excluder on.  

First week of August:

  • Bees have filled and are starting to cap the honey in the "borrowed" super frame.


That's about all we have for now as far as updates.  Now that Ash is down with ACL repair, it will be just me doing inspections for the next little while.  Also, my father-in-law should be harvesting soon so I'll be sure to chronicle that.  Bees are amazing!


Friday, May 30, 2014

Summer Plan 2014

While the sweetest words of childhood are: "last day of school" to me they mean the beginning of some prime domestic training. Luckily we have a lot of fun in the process of practicing some more time- intensive projects. 
Summer Plan 2014
Chores:
Deep clean pantry
Wash windows & blinds
Weekly house and yard work

Outings:
This is the Place Heritage Park
Pioneer Trek
Bear lake family reunion
Aquarium
Monte Cristo - camping
Lagoon
Cherry Hill
Logan day trip
Vivian Park geocaching

Parties:
Emma Cafe
Americana-Rama
Luau

Projects:
Dollhouse - make some construction progress
Paint & trim out bedroom wall
Video/record Grandma Dawnie's history & memories

Homemaking Days:
Baking - cinnamon twists & starlight sugar crisps
Sewing (Nate scout patches; Emma jeans apron)
Canning - tomatoes

Monday, May 19, 2014

Beekeeping Week 5: Our 4th Hive Check

Ok, so I don't have many still photos.  Lots of burr comb which we scraped off and let sit for a day to let the bees clean anything out they wanted.  We then put it in a ziploc bag in the freezer to kill off any of the ants that were attracted to it.  I'll melt it down later on in a dedicated crockpot.   We did spot the Bluebell queen for the first time, but queen Buttercup was hiding.  New eggs were evidence that she's still around and well though.  The bees weren't ready for another brood box yet, maybe next week.  It was fun to see the newly hatched bees - lighter in color and more "fur" around their eyes.
My husband spliced together a new video of this week's check (please excuse the few seconds of repeated clip - it was late at night).  Also, it is really hard to video this since I can either help or video, but not both very well.  So it ends up being amateur in the extreme.
Nonetheless - here it is: Brimhall bees video Checking hive "bluebell"

Burr comb and hatched brood

Tuesday, May 13, 2014

Beekeeping Week 4: Our 3rd Hive Check

So we are anxiously awaiting the hatching of new brood in our hives.  Hopefully by next week there will be a lot more worker bees!  Highlight's from this week's hive check:
We experimented with pine needles in our smoker this week.  Lots of smoke, but short lived.

Nice full frame of brood - check out the burr comb.  
Can you spot the queen?  Also look closely at those open cells and you can see newly hatched eggs (young larva) surrounded by royal jelly.  Yep - every bee gets a dose of royal jelly - just not as much as a future queen.

Take a look at the color gradient.  Bees like to have a border of honey (light comb around the outside) then a ring of pollen (colorful cells) and then brood in the center (capped hello).


Here's the burr comb harvest.  Lip balm here we come!


Be sure to check out the youtube channel for video updates: https://www.youtube.com/channel/UCky8mhDQVb37iRGv_k05Otw


Monday, May 5, 2014

Beekeeping Week 3: Our second hive check


Our second hive check was a lot less stressful, and we saw some positive signs of healthy hives.
New video clips on our second inspection, spotting one of our queens and what the hives look like during an average day: https://www.youtube.com/channel/UCky8mhDQVb37iRGv_k05Otw
See those tiny white marks on the black comb foundation?  Those are eggs.  Good sign!  This means the Queen has been there within the past three days.

If you look closely into the cells, you'll see curled up white bee larva.  That is also a good sign - we could be getting new adult bees soon.  
See that bump towards the top corner of the frame?  That is a drone cell.  Kind of interesting.

This is capped brood.  See how the surface looks very uneven and pitted?  That forms an air-permeable layer that allows brood to develop.

Can you spot the queen?

Tuesday, April 29, 2014

Beekeeping Week 2: Our first hive check

Well one week after hiving our bees, we did our first hive check.  It was a fairly cool day, so most of the bees were in the hive.  Because of the temperature, we didn't want to disturb the bees too much or take too much time gawking and cool down the hive unnecessarily.  Although we did not spot eggs (the frames were way to crowded) we did spot both queens.  The girls had done a great job of drawing out comb on 2 or 3 frames per hive.  Next week the weather should be warmer and we should be able to get a better look and chance to hopefully spot eggs and larvae.
Brimhall Bees - Youtube


Took off the lid and the feeder.  Our bees haven't been drinking the syrup from our feeder - maybe they don't like the flavor of the additive, or are just getting enough from the natural nectar flow around here.

Using our fun Dadant smoker that my parents brought back from Iowa.

Checking the frames.  My husband checked one hive and I checked the other.  He's the crazy one with no gloves.  Happily,  no one got stung.

As you spread the frames apart, the girls hang onto each other.  So funny!

Removing the empty queen cages.

Can you spot the queen?
Burr comb from one of the hives where the frames were spread by the queen cage.  

Tuesday, April 22, 2014

Beekeeping: Week 1

I know - Beekeeping wasn't one of the original 12 domestic arts, but it's our latest adventure and I think that bee husbandry can qualify as both domestic and certainly an art.  We've been planning and preparing for this for over a year and finally our lovely bees are here.  So here's a look at our first week of what I hope will be a long, adventurous run at being beekeepers.  So far it has been very interesting and somewhat therapeutic - a shared hobby is always a bonus.
Here's a link to some youtube videos: Youtube Brimhall Bees

Picked up our 2 packets (3 lbs each) of Italian bees at Deseret Hive Supply in Ogden Utah.  We kept them in the garage for a day following the recommendation of Deseret Hive Supply.
My husband installed one packet into one hive and I installed the other.  I felt really bad to be squishing a few bees here and there in the process, but it was inevitable.
Here's a look at the inside of a packet box/container.

We had to get used to working around each other in bulky suits, unfamiliar tasks and somewhat cramped quarters on our bee platform.
Our 11 year old daughter wanted to be part of the action and loves checking on "the girls".
Sugar syrup with ProHealth added.  (As a side note - a few days later, the bees didn't seem to be drinking much syrup.  There is however a fairly strong nectar flow on right now, so hopefully that accounts for it.)
We left the cans and packet boxes near the hives to allow all the bees to clear out and find their new homes.  At our daughter's request I named the blue hive the "bluebells" and the yellow hive the "buttercups".
I check on them during the day and text my husband a picture of the hives so he can get an update at work.  Yes, we are that much of apiarist-nerds.
One of our buttercup gals all tuckered out.  And yes I do talk to the bees as I watch them and check to see if they're bringing pollen in.

Monday, March 17, 2014

Civility: Teaching Respect for the Elderly

I have been blessed with a wonderful husband that values family and has made living close to family a priority.  As a result, my children know and see all their grandparents on a regular basis.  So how is this a domestic skill you ask?  Just this - graciousness and civility are dying if not already lost traits in society.  Think about:
  • the beauty of a sincere thank-you note 
  • the pleasure at having someone offer to help clean-up after a meal 
  • the quiet elegance of sitting and truly listening to someone
  • the respect and love shown when someone seeks the advice of a parent or grandparent
In our noisy, self-centered, youth-worshiping society these gracious and noble traits are no longer widely cultivated.  I believe that exposing your children to interactions with individuals of varying ages is one of the most effective ways to cultivate respect and civility.  There is so much wisdom in the decades of experience within those aging grandparents, teachers or neighbors.  What a shame it is to let all that wisdom and history slip away without passing it on to subsequent generations.  So whether you live close to grandparents or not, you do live close to elderly members of your community.  Why not take advantage of the learning experience alongside your children and visit with some of them?
Here are a few ideas to get you started:
  • Contact a local assisted living center and ask about visiting with some of the residents.
  • Grab your kids, a checker board or book and just sit down with an elderly neighbor or family member.
  • Ask specific quesitons about what life was like when they grew up (what was their first car, what was the first president they remember, what they remember about historical events such as the Kennedy assassination, wars, the first moon landing etc.).
  • If memory problems are present, talk about the game you brought or the book you brought.
  • Pictures are often effective at evoking memories and conversation. 
  • As a parent, be the example for your children.  They will watch how you take care of your parents and grandparents and most likely emulate your example in a few decades.  So if you want to be a loved and respected aging member of your family, it starts now with how you treat your aging family members.
Not only does this give some interesting perspective into history, but it also teaches your children social skills.  You may initially feel as though you are doing it as a favor to the elderly individual, but soon you'll realize that you are the true beneficiary.   In previous generations, respect, honor and good manners were the norm - let's not let that tradition pass when they do.  Set a time for your family to visit with the elderly. 


Wednesday, March 5, 2014

Beekeeping: If You Paint It, They Will Come

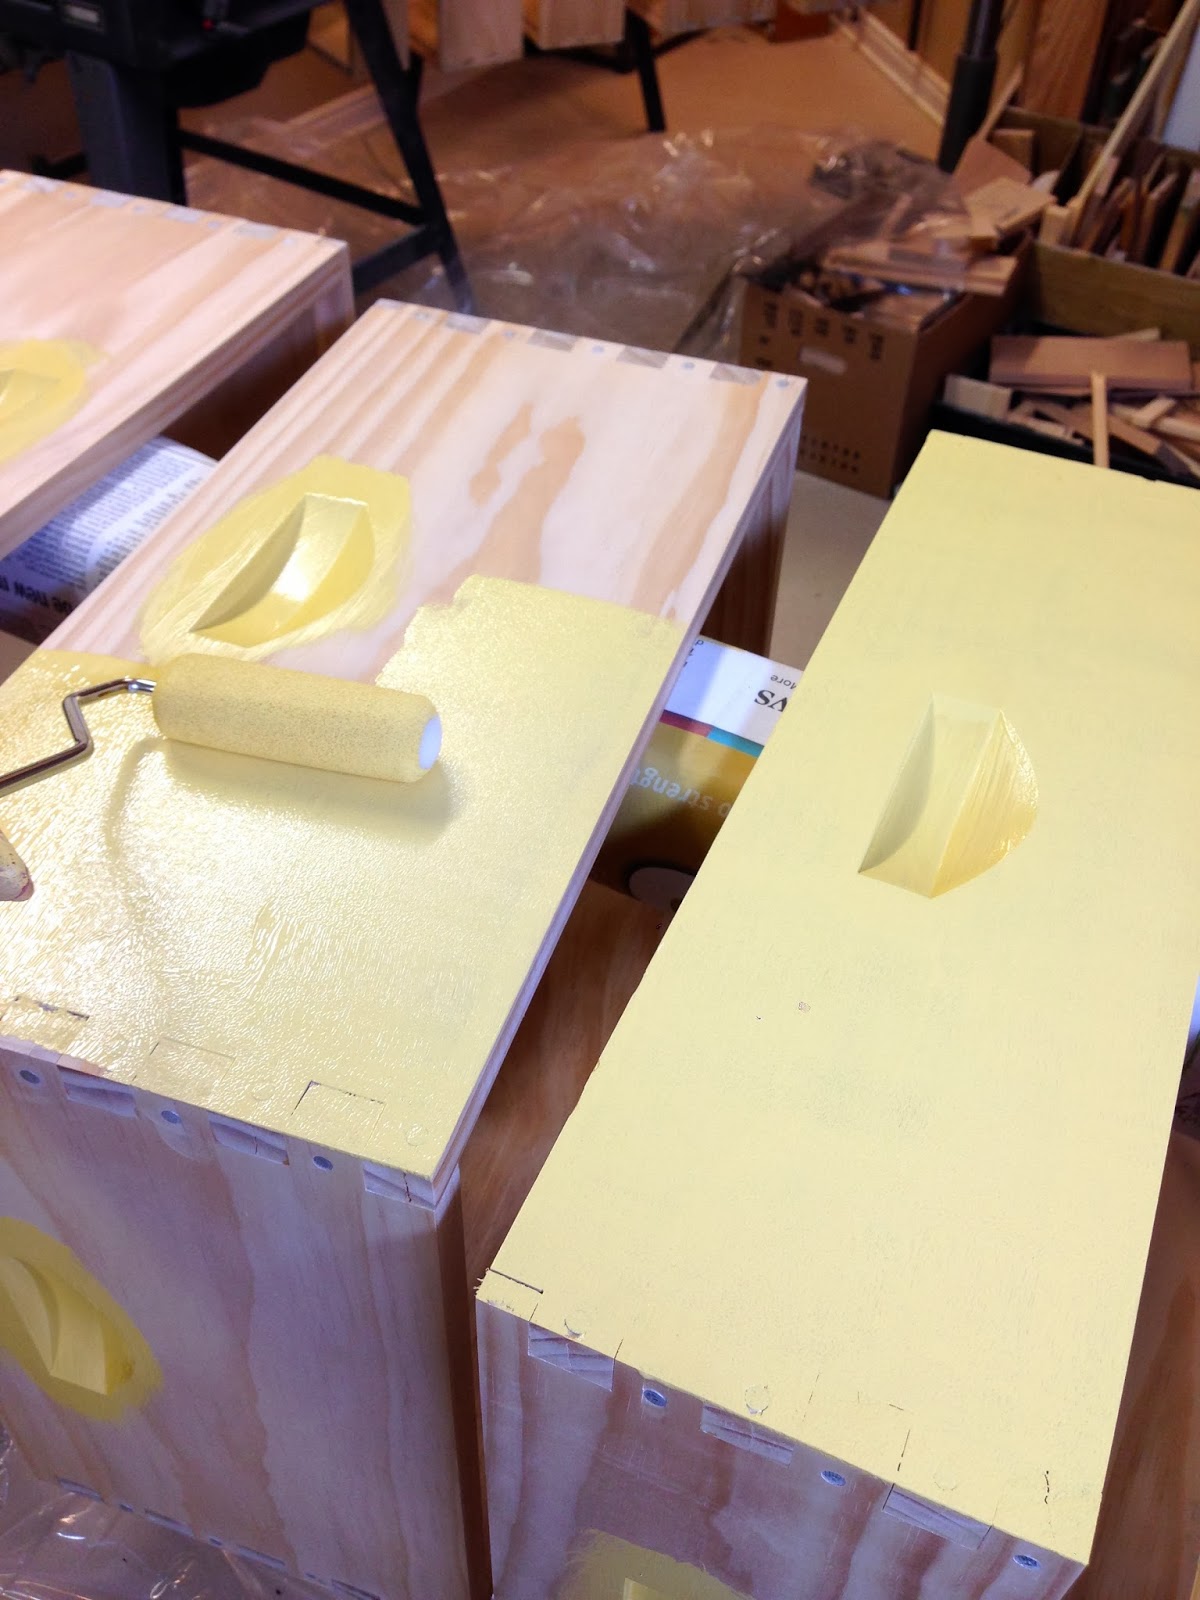
My husband and I have been getting ready to keep bees for almost a year now and are anxiously awaiting the arrival of our first 2 packets of bees.  My husband assembled the beehives and I painted them.  Once the hive boxes were assembled and sanded, I wiped them down with a tack cloth to remove all the dust, then "strung" them on a 2x4 and a 4x4 that were balanced on some work surfaces in my parent's shop.  (The handle of a rake or shovel steadied on a couple saw horses in a garage would work just as well.) I did wrap the 2x4 & 4x4 in newspaper so that my lumber didn't get painted as well.  With some plastic drop cloths spread out below, I was ready to roll.


Instead of using the predictable white paint, I decided to add some color to our beekeeping adventure.  I purchased 2 quarts of Behr Exterior Enamel Ultra Premium (contains a primer) and had the store tint one yellow and one light blue.  I found that using a small sponge roller made quick work of the painting.
I got so caught up with my yellow paint that I found I had painted all the boxes yellow instead of leaving some to be painted blue.  So I ended up painted a coat of blue over the yellow for one set of boxes.
This left the box handle yellow and I was convinced that they looked much more charming that way.

So I painted the yellow box handles blue to coordinate.
I gave each set of hive boxes 3 coats of paint, allowing each coat to dry before adding another coat.
I still had quite a bit of paint left and my husband had made a "nuke" and a swarm trap that needed to be painted.  So instead of buying another color and wasting the remaining paint, I decided to mix the two colors and paint the swarm trap and nuke green.
Once everything had three coats (making sure to paint only the exterior-exposed surfaces and keep the bee's living space paint free), all that was left to do was clean up.
Now we're set with our cheerful-colored hives and they will have over a month for the paint to "air out" so all the residual paint fumes can dissipate before we hive our bees.


Monday, February 17, 2014

Cooking: A Tale of Croissants and Cronuts

My husband has long wished that I would try my hand at making cronuts ever since he heard about the extra-rich-cousin-of-the-donut.  So finally for Valentine's day I decided to fulfill his wish - and I'll admit I was a bit curious.  I decided to kill two birds with one stone by making a double batch of croissant dough and using a little for cronuts, and the rest for croissants at Sunday dinner.  The result?  Awfully rich, but quite tasty.  Will I make them again?  Maybe, but probably no more frequently that once a year.  I'm not a big deep-fat-frying fan, but occasionally I'll make apple fritters, donuts, or funnel cake.  But deep fat-frying is just to heavy and greasy for me to do more than 4 times a year or so.  At any rate, here's the recipe that began my cronut adventure:

Croissants (Trish’s Aunt Nina’s Recipe)


3/4 cup butter

1/4 cup flour

Mix, place on plastic wrap.  Cover and roll out to be 4”x 10”. Chill.

1 pkg. Yeast

1/4 cup warm water

1 Tbsp. Sugar

Mix together and let stand 5 minutes.

1 egg

3/4 cup milk

2 Tbsp. Sugar

1 tsp. Salt

Beat and add to yeast mixture. 
3 (approx.) cups flour.  Mix in until dough leaves sides of bowl.

Roll out to 12” square.  Place butter in center, fold both sides over.  Roll out, turn 90 degrees, fold over in thirds again.  Repeat rolling and turning process 2 more times.  Wrap in plastic and chill overnight or 6-8 hours.  Cut in half and roll into a 12” circle.  Cut into 8 wedges and roll up into crescents.  Repeat with other half of dough. Let raise 30-45 minutes.  Bake at 375 for 15-20 min.


I rolled the dough out about 1/3 inch thick, cut them out (using two sizes of heart cookie cutters)  then let them raise in a slightly warm oven for about 20 minutes.

Fried them in canola oil that was heated to 375 degrees F.  A minute or so each side.

Let them drain on paper towel.

Once slightly cooled, dipped them in maple glaze (powdered sugar, evaporated milk, a little water and some maple flavoring)

Strung them on a metal skewer to drain.

Let them dry on a baking rack.

Final product.